When it comes to preserving potatoes, canning is one of your best options. However, potatoes are usually not on the list for canning since they can be found all year round. Either way if you want to can potatoes you can still can them even without using a pressure cooker. To can potatoes without using a pressure cooker simply follow the steps below.
Contents
The Tools Required To Can Potatoes
- Jars (pint/quart)
- Lid/seals and rings
- Large pot
- Potato peeler
- A large salad bowl or small bowls for holding chopped potatoes
- Sharp knife
- Jar lifting tongs
- A funnel (optional)
- Canning knife
- Magnetic lid lifter
- Colander for draining
- Clean towels and dishcloth
The Potatoes You Need
For canning you need small and medium-sized potatoes. You can also pick large tubers if you prefer to have the large ones canned. If you want to pack them whole, go for potatoes that are about 1-2 inches in diameter. Large potatoes need to be sliced. Ensure that you avoid potatoes with too many green or black spots and those that seem shrivelled. When it comes to the variety of potatoes, you can work with all types such as red, yellow, or white-skinned potatoes. The less starchy type like the red-skinned type store well plus they taste great after canning.

Thoroughly Wash The Potatoes
The first thing you need to do before you can your potatoes or any other kind of vegetable is to thoroughly wash them, whether you use a pressure canner or not. Ensure that you wash the potatoes in cold or cool water. After washing peel your potatoes and wash them again. Do not hesitate to rewash the potatoes if they are not clean. Afterward mix a gallon of water with lemon juice in a large salad bowl and put it aside. The bowl should be large enough to hold all the chopped potatoes. Wash and scrub all the potatoes in lukewarm water. Ensure that you peel and carve out all the discoloured and soft spots including the eyes. Chop large potatoes into small cubes or slices, the small or medium-sized potatoes can be cut into quarters. Take note that small inch pieces can get overcooked, especially if you are canning at higher altitudes. Make sure that you keep the cubes fairly uniform for best canning results. Also ensure that you soak the potato cubes in lemon water to stop them from turning brown because of the exposure to oxygen.
Blanch Your Potatoes
The next step after washing and preparing your potatoes is to blanch them. First drain the chopped potatoes from the lemon water and place them in a large pot of boiling water. Let your tubers sit in the pot of boiling water for about 2 minutes or so if you have chopped them into 1-inch cubes and for about 8-10 minutes if you want to can them whole or in quarters. It is important to note that this step is for blanching and not for cooking the potatoes. When you are done drain the tubers using a colander.
Immerse Your Potatoes In A Pickling Mixture
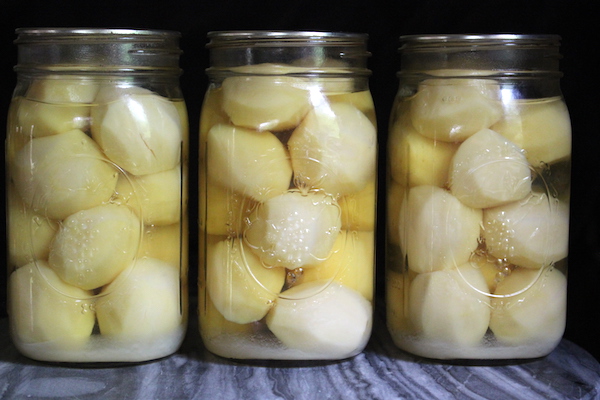
The following step will be to immerse your chopped potatoes in a pickling mixture. If you were using a pressure cooker, you would then put some boiling water into the jars before placing the jars into a pressure cooker. Since you are not using a pressure cooker, the process is a bit different. At this stage you should pickle your potatoes. In order to make the brine, simply add vinegar, water, and some pickling salt. You can also add other ingredients such as garlic, bay leaves, and peppercorns. To prepare the mixture simply put the ingredients into a pot, and bring it to a boil. Bring your ingredients to cook until the dry ingredients are fully dissolved. When the solution is ready add your chopped potatoes. Afterwards pack the brine together with the solution in your jars.
Release Trapped Air
Another essential step is releasing trapped air. In order to do this simply press the potatoes or the lid of your jar so that you release any air that is trapped in your jar. Releasing the trapped air will help you preserve the shelf life of your potatoes. It is not uncommon for air to be trapped. After packing the potatoes ensure that there are no air bubbles or pockets of air inside the jars. If so, they must be removed. The best way to remove air bubbles or pockets of air in the jars is by placing a non-metallic spatula or plastic knife inside the canning jar. Gently press the spatula against the potatoes in order to create a path for the trapped air to escape. Repeat that process several times around the inside of the jar. Sometimes air bubbles may not be visible because they can be trapped between pieces of chopped potatoes but they must be removed. It is best to use the spatula each time to remove any invisible or visible air bubbles.
Clean Your Jar Rims
It is critical to clean your jar rims before you place the lids on your jars. You should also ensure that the rims are clean and that they do not have any residue on them by wiping them down with a cloth. If you do not clean your jar rims well you risk bacteria growth in your canned potatoes.
Place Cans In Water Bath
The last step when canning your potatoes is placing them in water bath. Before you place them in hot water make sure that your jars are sealed properly. When you are done sealing your jars, place them in a heating bath for a reasonable amount of time, based on the size of your jars and the quantity of your jars. The average amount of time can be five minutes or so in hot water. With this hot-water-bath method, the jars are kept submerged in boiling water for 15-90 minutes. It is important to note that botulism spores don’t die at 212F, which is the boiling point of water. However, A pressure canner boiling water at 15PSI raises the boiling point to 250F or so which can kill the spores. That is why it is recommended to use a pressure cooker for canning.